WG/radio/Mac Broadcasting
Return to OBR Wiki Page
Producing LIVE OB Radio from a Mac Using Nicecast (Outdated)
Getting Started
First, you'll need to collect the appropriate hardware and software.
Hardware
You'll need, at a minimum, a Mac (anything made in the last few years should be good), a microphone and headphones. You can use a headset with a built-in microphone just fine, as long as it is just one person talking. From here on in, when referring to the "microphone", it means either a free standing microphone or headset microphone as appropriate. If you are concerned about quality (and you should be!), don't use the built-in microphone and speakers on your mac.
There are two basic ways to connect headphones and microphones: a 1/8th inch headphone jack connector, or via USB.
If you wish to use more than one microphone on a Mac (say one for the host, one for the guest), you will want to use USB, as it's very easy to mix the two together.
The OBRadio group has a number of USB microphones available, if you need one temporarily contact the list and arrangements can be made to get one to you.
Software
Note: This guide is based on the latest version of Mac OS X, Lion. Some of the details will be slightly different, but the overall process is the same on Snow Leopard.
The simplest case, you just need what is called an IceCast "source client". The program 'Nicecast' is fantastic, and free to use for up to an hour, after which it starts adding noise to your broadcast. If you're staying under an hour you should use Nicecast. You can find it on the Nicecast Website. Note that Nicecast only streams mp3, not Ogg Vorbis.
If you need to broadcast using Ogg Vorbis, prefer an open source client, or are broadcasting for more than 60 minutes, you should try 'butt' ("Broadcast Using This Tool"). Download butt from the it's homepage.
Install either piece of software as you would any other Mac software. Do not launch it yet though!
Setup Testing
First, you need to figure out how your microphone is represented in Mac OS X.
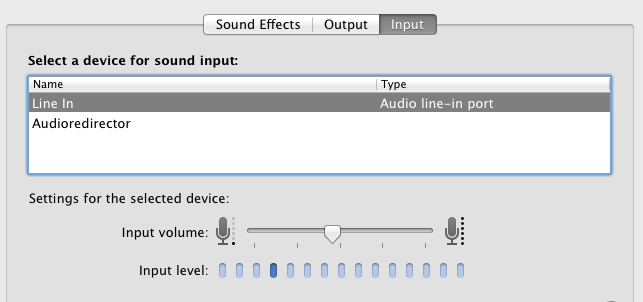
Before plugging in the microphone into your computer, open System Preferences and go to the Sound panel, and select the "Input" tab. It should look similar to this:
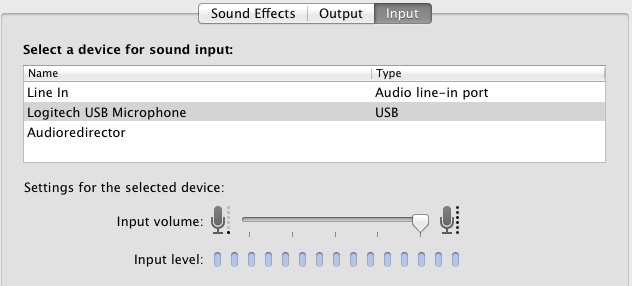
If you are using a USB microphone, plug it in. The list of devices should change to something similar to this: 
The new entry is your microphone, remember what this is called. In the above case it's called "Logitech USB Microphone". A new device should show up with a type of "USB".
If you are using a 1/8th inch microphone, your list of device inputs may not change. Select the one called "Line In".
At the bottom of the panel there is a level meter, test that your microphone is working by tapping it or blowing into it. The level meter should jump from left to right.
If the meter doesn't move:
- try selecting other devices
- is the microphone off or muted?
- are you talking into the right microphone?
- did the new mic show up in the list? If not: if it's USB plug it into another USB port. Try plugging a USB mic directly into the computer, rather than a hub. If it's a 1/8th inch microphone, make sure it is plugged into the microphone jack and not the headphone jack
- Increase the input volume
Setting levels
While testing you might notice that no matter how loud you shout, you can't max out the meter, or you might find that the lightest blow makes it max out. Adjust the input volume until your normal speaking voice at a normal distance from the microphone gets to about 3/4ths of the way to max. someone come up with better metrics, I just guessed -- matt
Now you are ready to go!
Configuring the Software
If you are using Nicecast, read on. If you are using butt, please skip to #Configuring_butt.
Configuring Nicecast
Nicecast has a very nice built-in manual that is accessible from the help menu, refer to that for any problems. This part of the guide will just give you a quick overview of how to do a simple setup.
Setting the source
Launch Nicecast, then click on the "Source" button. In the panel below the main screen labeled "Source", select "Audio Device" from the drop down menu, then use the select button to select the audio device name that was configured earlier.
Stream information
Fill in the appropriate information in the Info tab. The URL entry is for more information on your show, or topic, not for the stream itself.
Quality settings
Within the quality settings, set the preset to what is appropriate for your connection type. If you are streaming over a WiFi hotspot, or at E5 where bandwidth is limited, you may want to select Low as your preset.
Testing
At this point, in Nicecast click Start Broadcasting. Talk into your mic and you should hear what you say back out your speakers or headphones. You can set which speakers/headphones are used by selecting the preferred device in System Preferences, Sound Panel, Output tab.
Now click the 'Share' button and use the mouse to select the text next to 'Local:', then copy it, using cmd-C or the Edit menu, Copy. Do not use the 'Copy' button, as that copies the 'Internet:' field instead.
Open iTunes, hit cmd-U to subscribe to a new stream. Hit paste (cmd-V or Edit Paste) into that field, and click OK. In a few moments you'll hear your radio show come back out through iTunes!
Troubleshooting
tbd
Configuring the Server
At this point the stream is being 'broadcast' from your computer, we want to broadcast from occupyboston.org. Quit iTunes, and hit Stop Broadcast in Nicecast.
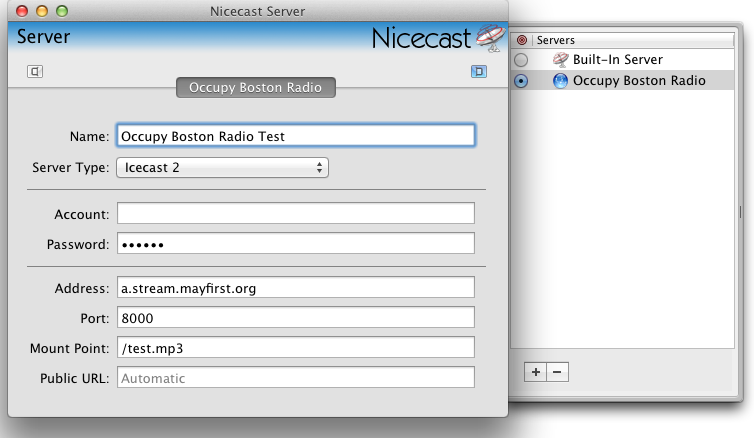
In Nicecast, go to the Window menu, and select "Show Server". In the drawer on the right, click + to add a new server. Configure it as shown in this image: 
The password should have been given to you already by a member of the radio team. Do not share it.
For the mount point, you may set that to another filename, but start it with a slash and end it with '.mp3'.
Select your new server and then hit Start Broadcasting.
Open your web browser and go to the stream status page. You should see two 'mount points', one called 'occupy.ogg', and another, yours, called 'test.mp3' (or whatever you decided upon). Click on the link 'm3u' next to the test.mp3 mount point and in a few moments iTunes will open and you should hear yourself, slightly delayed. You are now LIVE on a test stream! You can share this link with a friend to help test it for you. Play around a bit, see how it sounds if you make loud noises or speak softly. Adjust the level in the Sound System Preference as you see fit. When you are done hit Stop Broadcast in Nicecast. If everything sounds good, you are almost ready to broadcast LIVE on the main OB Radio stream!
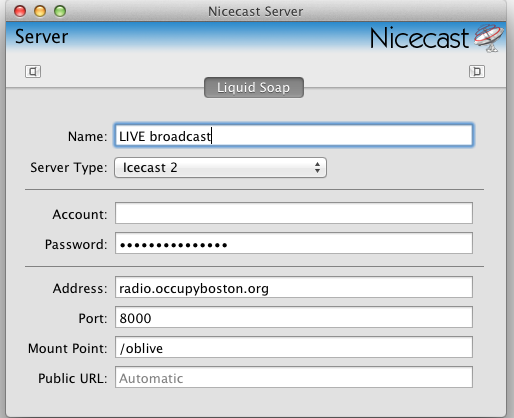
In order to configure the live server, change your configuration thus:
Troubleshooting
tbd
Nicecast Tips
tbd: How to record? How to mix in apps?
Configuring butt
tbd
Configuring multiple mics
OS X allows mixing multiple sound inputs fairly easily and transparently, by creating a new 'aggregate device'. This device shows up in all of the input audio device selection lists in any sound app in OS X.
To create a new aggregate device, plugin the devices you want to mix together then launch the application "Audio Midi Setup" from /Applications/Utilities. Select + from the lower left hand corner, and then select "Create Aggregate Device". Tick the box next to the names of the devices you want to mix. Then on the left hand side, click on 'Aggregate Device' to rename it to something you can remember. Click on each of the devices below the name, and make sure the volume is set appropriately, and close the application.
You can test the device using the level meter in the Sound panel in System Preferences. Then simply select that device as your audio source in Nicecast or butt and it will just work.


